Trying to figure out how to prevent emails from going to spam? The short answer is you have to build trust with inbox providers like Gmail and Outlook. Forget what you knew about spam filters from a few years ago. Today's filters are sophisticated AI systems that act more like a credit score for your sending practices.
They track your technical setup, your sending behavior, and—most importantly—how your subscribers actually engage with your emails. Landing in the inbox consistently is no longer a game of avoiding a few "spammy" keywords; it's a proactive strategy built on proving your emails are wanted.
Understanding the Modern Spam Filter
If your strategy is still centered on avoiding words like "free" or "guaranteed," you're playing a game that ended years ago. Inbox providers have moved on. They now use complex, behavior-driven algorithms that judge you on hundreds of signals.
At the end of the day, these smart filters are trying to answer one fundamental question: "Is this an email our user actually wants?"
Actionable Takeaway: Your subscribers' actions—like opens, clicks, replies, and even just moving your email out of the promotions tab—are now the most powerful signals of your email's quality. Conversely, negative signals like deleting an email without opening it or marking it as spam can tank your reputation almost instantly.
The scale of this challenge is massive. A staggering 46% of the world’s 347 billion daily emails are flagged as spam. In response, providers like Google have gotten incredibly good at their job, blocking over 99.9% of spam and filtering nearly 10 million unwanted emails every single minute.
The Four Pillars of Modern Email Deliverability
To consistently stay out of the spam folder, you need a rock-solid foundation. We can break this down into four core pillars. Get these right, and you'll send strong, positive signals to inbox providers, proving you're a legitimate sender people want to hear from.
Here’s a quick overview of what we'll dive into:
| Pillar | What It Is | Why It Matters for Your Inbox Placement |
|---|---|---|
| Technical Authentication | Your email's digital passport. Protocols like SPF, DKIM, and DMARC verify your identity and prevent others from sending email as you. | Authentication proves you are who you say you are, which is the first step in building trust with inbox providers. |
| Sender Reputation | The "credit score" inbox providers assign to your sending domain and IP address based on your history. | A low score, caused by high complaint rates or sending to bad addresses, tells filters your emails are unwanted. |
| Content & Engagement | The quality of your email content and how subscribers interact with it (opens, clicks, replies, etc.). | Positive engagement is the ultimate trust signal. It shows providers that people value what you send. |
| List Hygiene & Quality | The health of your subscriber list. This means using confirmed opt-ins and regularly cleaning out unengaged contacts. | A clean list ensures you're only sending to people who want your emails, which naturally boosts engagement and protects your reputation. |
Mastering these four areas is simply non-negotiable for anyone serious about email marketing. For a deeper dive, explore these best practices to send better emails and increase conversions.
Now, let's break down each pillar into actionable steps you can start using today.
Building Trust with Technical Email Authentication
Think of technical email authentication as your email's digital passport. It's the first thing inbox providers like Gmail and Outlook check to verify you are who you say you are. Without it, your messages will be treated with extreme suspicion right from the start.
Getting this foundation right is the single most impactful technical change you can make for your deliverability. It's how you begin building the trust necessary to consistently land in the inbox.
Step 1: Set Up SPF (Sender Policy Framework)
SPF is the most basic form of authentication. Think of it as a public list of all the servers you've authorized to send emails on behalf of your domain. When an email arrives, the receiving server checks the sender's IP address against your published SPF list.
If the IP is on the list, it's a match. If not, it's a red flag. This simple check is surprisingly effective at stopping others from sending emails that look like they came from you. To get this set up, you'll add a simple TXT record in your domain's DNS settings, which you can typically find in your GoDaddy or Namecheap account.
Step 2: Implement DKIM (DomainKeys Identified Mail)
While SPF verifies the sender, DKIM verifies the message. Picture it as a tamper-proof digital seal on a letter. DKIM adds a unique, encrypted signature to your email's header that is directly tied to your domain.
When the email is received, the inbox provider uses a public key from your DNS records to check this signature. A valid signature confirms two critical things:
- The email genuinely came from your domain.
- The content of the email hasn't been altered in transit.
This digital signature provides a strong layer of security and trust, assuring providers that the message your subscriber receives is the exact one you sent.
Step 3: Enforce with DMARC (Domain-based Message Authentication)
DMARC is the final, crucial piece of the authentication puzzle. It builds on SPF and DKIM by telling inbox providers exactly what to do with emails that fail those checks.
With a DMARC policy, you can instruct providers to:
- None: Do nothing for now and just monitor the results. (This is the best starting point!)
- Quarantine: Send the suspicious emails straight to the spam folder.
- Reject: Block the emails from being delivered entirely.
DMARC also sends you valuable reports, giving you incredible visibility into who is sending email using your domain. This lets you spot potential abuse and protect your brand's reputation. Starting with a p=none policy is always the safest way to begin monitoring before you move to stricter enforcement.
How to Set Up Your Authentication Records
Implementing these protocols involves adding specific TXT records to your domain's DNS settings. This might sound intimidating, but your Email Service Provider (ESP)—like Mailchimp, ConvertKit, or Klaviyo—does most of the heavy lifting for you.
Here's a step-by-step guide:
- Log into your ESP and navigate to the settings for domains or authentication.
- Your ESP will generate the specific SPF and DKIM values for your domain.
- Log into your domain registrar—this is where you bought your domain (e.g., GoDaddy, Namecheap, Cloudflare).
- Find the DNS Management section where you can add or edit records.
- Add new TXT records by carefully copying the values from your ESP and pasting them into the appropriate fields.
It's crucial that these records are set up correctly. For those just getting started, understanding the role of your domain is fundamental. You can dive deeper into what a domain for email is and why it's so important in our detailed guide.
Correctly configured authentication is a powerful signal to the world's email providers. It shows you're a serious, professional sender. Without this critical step, even the most beautifully crafted emails are at high risk of being flagged as spam. To actively combat this, you might also consider exploring specialized Unspam tools that can help diagnose and fix deliverability issues.
How to Build and Protect Your Sender Reputation
Getting your technical authentication set up proves who you are. Now, the real work begins: proving you’re a sender worth trusting. This all comes down to your sender reputation, which is basically the credit score for your entire email program.
Every time you send an email, Internet Service Providers (ISPs) like Gmail and Outlook are watching. They assign a reputation score to your sending domain and IP address based on everything you do. A great score gets you a ticket straight to the inbox. A poor score? That’s a one-way trip to the spam folder.
If you're starting with a new domain or IP, building that reputation from scratch is one of the most important things you can do to keep your emails out of the spam folder.
The Critical IP Warm-Up Process
Imagine walking into a bank and asking for a million-dollar loan with no credit history. That's what it looks like to an ISP when you suddenly start blasting thousands of emails from a brand-new IP address. It immediately screams "spammer."
You have to build trust gradually through a proper IP warm-up. This involves starting with a very small number of emails and slowly increasing your volume over several weeks. This slow ramp-up gives ISPs a chance to see your sending patterns, measure how people engage, and ultimately decide that you're a legitimate sender. Rushing this is a rookie mistake that can wreck your reputation before you even get started.
Actionable Takeaway: The point of a warm-up isn't just about volume; it's about quality. Your first sends should go to your absolute best subscribers—the die-hards who open and click on everything. Their positive engagement sends a powerful signal to ISPs that your emails are wanted.
Here’s a sample schedule you can adapt. The key isn't the exact numbers but the principle: start small, be consistent, and ramp up slowly.
| Week | Daily Sending Volume | Target Audience |
|---|---|---|
| 1 | 50 - 100 emails/day | Your most active subscribers (opened/clicked in the last 30 days) |
| 2 | 250 - 500 emails/day | Subscribers active in the last 60 days |
| 3 | 1,000 - 2,500 emails/day | Subscribers active in the last 90 days |
| 4 | 5,000+ emails/day | Your full, engaged list |
Dedicated vs. Shared IP: A Key Decision
Once you start sending a decent volume, you’ll hit a fork in the road: stick with a shared IP or move to a dedicated one?
A shared IP is like living in an apartment building—you and a bunch of other senders share the same address, and your reputation is partly tied to theirs. A dedicated IP is your own private house where you have total control over its reputation, for better or for worse.
Most people start on a shared IP, and that’s perfectly fine for beginners or businesses with smaller lists. But if you’re sending over 100,000 emails/month, a dedicated IP is almost always the right move. It requires more work up front (like the warm-up process), but your deliverability destiny is entirely in your own hands.
Choosing Your IP Strategy: Dedicated vs. Shared
To help you decide, here’s a quick breakdown of the pros and cons of each approach.
| Factor | Dedicated IP | Shared IP |
|---|---|---|
| Control | You have 100% control over your sender reputation. | Your reputation is influenced by other senders on the IP. |
| Best For | High-volume senders (>100k/month) who want maximum control. | Low-volume senders, beginners, or those on a tight budget. |
| Warm-Up | Requires a careful, multi-week warm-up process from scratch. | Often pre-warmed, so you can start sending larger volumes sooner. |
| Cost | More expensive, as you're leasing the IP exclusively. | More cost-effective since the cost is split among many users. |
| Risk | Your mistakes directly impact you, but so do your good practices. | Risk of a "bad neighbor" with poor sending habits tanking the IP's reputation. |
Ultimately, the choice depends on your volume and how much control you want. For serious senders, the control a dedicated IP offers is invaluable.
The diagram below shows how SPF, DKIM, and DMARC work together. These authentication protocols are the foundation of your reputation, regardless of whether you’re using a shared or dedicated IP.
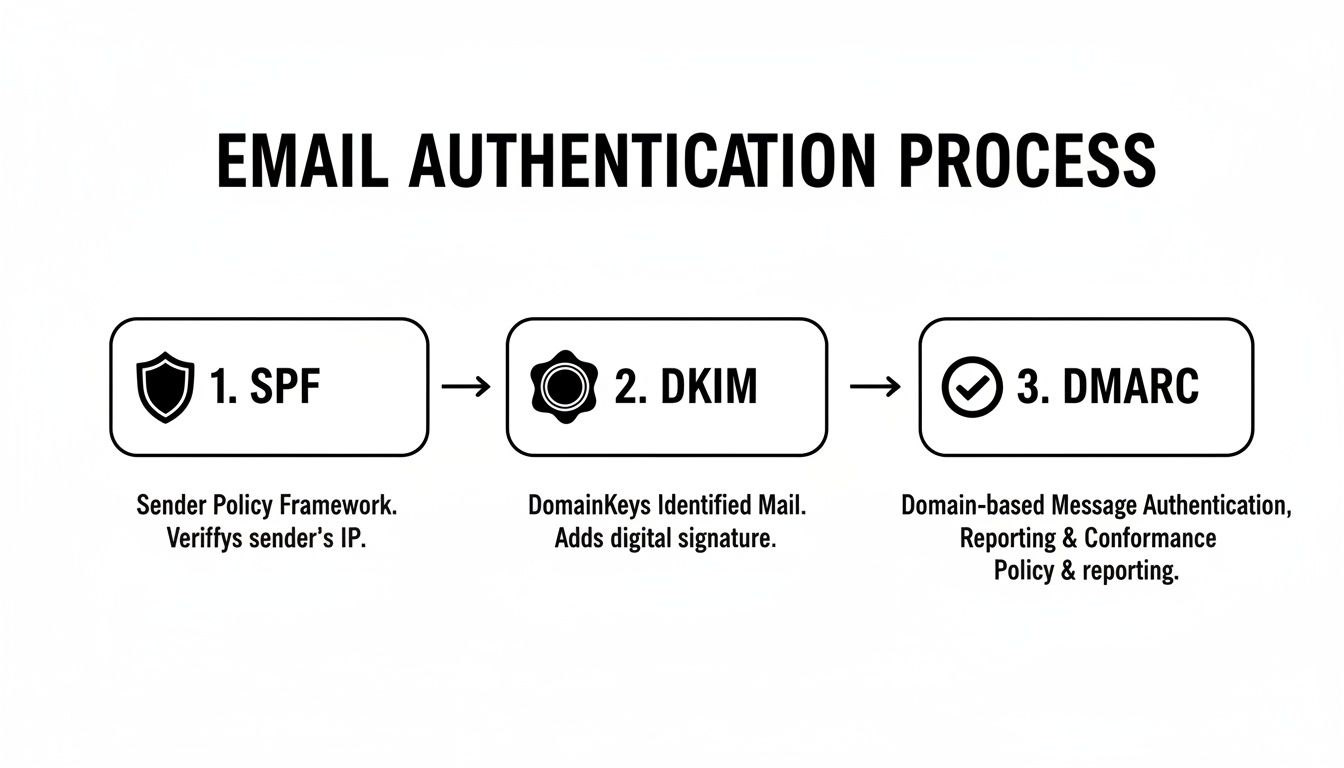
This technical handshake proves your identity and is the first thing ISPs check when evaluating your trustworthiness.
Monitoring Your Reputation Proactively
Building a great sender reputation takes weeks; ruining it can take minutes. Don't just set it and forget it—you have to be proactive about monitoring your reputation.
One of the biggest red flags for ISPs is a high bounce rate. It’s critical to understand what an email bounce rate is and take immediate action if you see yours start to creep up.
There are some fantastic free tools that can help. My go-to is Google Postmaster Tools. It gives you a direct line of sight into how Gmail, the biggest ISP of them all, sees your domain. You can track your domain reputation, IP reputation, spam complaint rates, and authentication status. Checking these metrics weekly allows you to spot trouble early and fix it before it does real damage.
Crafting Email Content That Inboxes Love
Beyond all the technical wizardry, the actual words, images, and links you put in your email send some of the strongest signals to spam filters. Getting this right is a balancing act—you need to create something that’s engaging for your subscribers but also looks trustworthy to inbox providers. This is a huge piece of the puzzle when you're trying to keep your emails out of the spam folder.

Spam filters are incredibly sophisticated now. They scrutinize everything from your subject line right down to your unsubscribe link to figure out your intent. Thankfully, a few smart adjustments to how you build your emails can make a world of difference.
Writing Compelling and Safe Subject Lines
Your subject line is your first impression. A bad one can get you flagged as spam before anyone even opens your email. The goal is to be enticing without falling back on the cheap tricks that spammers love.
Steer clear of these common traps:
- Over-the-top Punctuation and Emojis: Sure, a well-placed emoji can add personality, but going overboard with "!!!" or a string of characters is a surefire way to trigger filters.
- SHOUTING IN ALL CAPS: Writing in all capitals is the digital equivalent of yelling. It's a classic spam signal that you should avoid at all costs.
- Fake Prefixes: Never use "Re:" or "Fwd:" to trick someone into thinking it's part of an existing conversation. It’s deceptive, erodes trust instantly, and can get you blacklisted.
Instead, aim for clarity and curiosity. A subject line like, "A quick question about your goals," almost always performs better—and is much safer—than something like, "URGENT ACTION REQUIRED: Open Now For A HUGE Discount!!!"
Balancing Images and Text
Here’s a common mistake: sending an email that’s just one big image. While it might look great, this is a massive red flag for spam filters. Why? Because spammers historically used this tactic to hide malicious text.
A healthy text-to-image ratio is crucial. As a rule of thumb, aim for at least 500 characters of text for every major image. This proves to filters that you have real, readable content.
Actionable Takeaway: Ask yourself: "If all the images in this email were turned off, would it still make sense?" If the answer is no, you need more text. This doesn't just help with deliverability; it ensures your message still gets through to the roughly 40% of users who have images disabled by default.
For a deeper dive into content structure, understanding the pros and cons of an HTML or plain text email can give you valuable insights into what’s best for your audience.
Maintaining Clean HTML and Linking Practices
Believe it or not, your email's underlying code matters. Messy, broken HTML—often from copying and pasting directly from a Word document—can cause rendering problems and get flagged. Stick to the editor inside a reputable ESP to ensure your code is clean and mobile-friendly.
You also need to be strategic about your links:
- Ditch URL Shorteners: Services like bit.ly are a spammer's best friend because they hide a link's true destination. Filters know this. Always use the full, descriptive URL so providers (and your subscribers) know exactly where you’re sending them.
- Make Unsubscribing Painless: Hiding your unsubscribe link is one of the worst moves you can make. If someone can't easily opt out, their next click will be the "mark as spam" button, which is far more damaging to your sender reputation. A clear, prominent, one-click unsubscribe link shows inbox providers you respect your audience.
Using Subscriber Engagement to Your Advantage
Not too long ago, deliverability was all about technical signals. That game has completely changed. Today, inbox providers like Gmail and Outlook are basically digital focus groups, watching every little interaction people have with your emails to decide if you're sending value or just clutter.
This means every open, click, forward, and reply is a massive vote of confidence. On the flip side, negative signals—like someone deleting your email without opening it—can land you straight in the spam folder. Mastering subscriber engagement isn't just good marketing anymore; it's a non-negotiable part of how to prevent emails from going to spam.

Driving Positive Engagement Signals
You can't just hope for engagement; you have to design for it. The goal is to create a two-way street that encourages actions telling inbox providers, "Hey, people actually want this stuff!"
Here are a few tactics that work wonders:
- Ask a simple question. End your welcome email with, "What's the #1 thing you're hoping to learn? Just hit reply and let me know!" Every reply is a huge positive signal.
- Run a one-click poll. Embed a simple poll in your email. Ask something like, "Which topic should we cover next?" and link each option. Every click tells providers your audience is engaged.
- Encourage "save for later" actions. A simple line suggesting subscribers move your email to a specific folder for reference is a genius move. It tells inbox providers your content is valuable enough to keep.
User engagement is now a dominant factor in deliverability. Inbox providers are shifting their focus from old-school reputation toward how real humans react to your messages. If you cross a certain spam complaint threshold, their systems can automatically shove your campaigns into spam. The only way out is to lower complaints and prove people are engaging again. You can discover more insights about email deliverability trends on expertsender.com.
The Art of Sunsetting Inactive Subscribers
This is going to feel wrong, but one of the best things you can do for your deliverability is to remove people from your list. Sending emails to subscribers who never open them sends a loud, clear message to inbox providers: "This content isn't wanted."
A smaller, hyper-engaged list is infinitely more valuable than a huge, dead one. The process of strategically removing unengaged subscribers is called "sunsetting."
Actionable Takeaway: A clean list is a healthy list. Regularly pruning subscribers who show no signs of life—typically those who haven't opened or clicked an email in 90-120 days—is essential maintenance. It protects your sender reputation and ensures you're only investing in an audience that cares.
Here’s a simple, step-by-step sunsetting strategy:
- Isolate Your Inactive Segment: First, create a segment in your email platform of anyone who hasn't opened or clicked an email in the last 90 days.
- Launch a Re-Engagement Campaign: Don't just delete them yet. Send this group a targeted 2-3 email campaign with a punchy subject line like, "Is this goodbye?" or "Do you still want to hear from us?"
- Give Them a Clear Choice: Inside the email, explain that you're cleaning your list and give them a big, obvious, one-click link to stay subscribed.
- Say Goodbye with Confidence: After the campaign ends, confidently remove everyone who didn't click that link. It’s tough, but it's the right move for the long-term health of your email program. This one act can dramatically improve your open rates and keep you out of the spam folder for good.
Your Pre-Send Deliverability Checklist
Before you hit “send,” take a deep breath. Running through a quick pre-flight check can be the difference between landing in the inbox and getting tossed into the spam folder.
This isn't about getting lost in the technical weeds again. It's about building a simple, consistent habit that catches common mistakes before they can hurt your sender reputation.
First, run your email through a testing tool. I'm a big fan of services like Mail-tester. It gives you a straightforward 1-10 score and a report that flags everything from broken links to authentication hiccups. It’s an invaluable five-minute check.
With that done, just glance over these fundamentals one last time:
- Authentication Check: Use a free online tool to quickly confirm your SPF and DKIM records are valid and passing. This is your sanity check to make sure the technical foundation is solid.
- Content Scan: Read your subject line and body copy out loud. Does it sound like a human wrote it? Ditch any clickbait-y phrases or weird, excessive punctuation.
- List Hygiene: Are you sure you’re sending this to an engaged segment? This is your last chance to avoid blasting your entire list, especially those folks who haven't opened an email in months.
Pro Tip: Make a habit of checking Google Postmaster Tools regularly. While it's not a pre-send check, monitoring your domain reputation and spam complaint rates helps you spot negative trends before they snowball into a real crisis.
This simple routine is how you put all the lessons in this guide into consistent practice.
If you do just one thing after reading this, make it this: use a free online tool to check your domain's SPF and DKIM records right now.
Still Have Questions? Let's Clear Things Up
Even with a solid game plan, email deliverability can throw you some curveballs. It's totally normal. Most marketers bump into the same handful of confusing situations, so let's tackle the most common questions head-on.
Getting these fundamentals right is a huge part of learning how to prevent emails from going to spam for the long haul.
"My Sender Reputation Is Shot. How Long Will It Take to Fix?"
This is probably the most common question I get, and the honest answer is: it depends. Repairing a damaged sender reputation isn't like flipping a switch; you're essentially rebuilding trust with mailbox providers, and that takes time.
If the damage is minor, you might see improvements in a few weeks. But for a more serious reputation hit—like a blacklist event—you could be looking at a few months of consistent, positive sending behavior.
Your comeback plan involves being flawless. Send your absolute best content only to your most engaged subscribers, double-check that all your technical authentication is perfect, and if you've been blocked, warm up your volume again very slowly.
The single fastest way to show mailbox providers you've turned over a new leaf is by getting positive subscriber engagement. Every open, click, and reply from your loyal fans acts like a vote of confidence, speeding up your reputation recovery.
"How Do I Stop My Emails from Going to the Gmail Promotions Tab?"
Short answer: you don't. And you shouldn't even try.
Fighting the Gmail algorithm to land in the Primary tab is a game you can't win. It often backfires, hurting your deliverability in the long run. Remember, the Promotions tab isn't the spam folder. It’s actually a pretty smart sorting system that users appreciate.
Instead of fighting it, work with it. Your goal should be to create content so valuable and exciting that your subscribers actively go looking for your emails, wherever they land.
Think about it: when a user drags your email from Promotions to the Primary tab themselves, it sends one of the most powerful positive signals you can get. That action tells Google's algorithm, "Hey, this is important to me." That's worth more than any trick you could ever pull.
"Is It Ever Okay to Buy an Email List?"
Let me be crystal clear: No. Never. Buying an email list is the quickest way to obliterate your sender reputation, get your domain blacklisted, and undo all your hard work.
Purchased lists are a toxic mess, usually filled with:
- Dead email addresses that will send your bounce rate through the roof.
- Spam traps, which are basically fake emails set up by providers specifically to catch and block senders who use shady lists.
- Real people who never asked to hear from you, which is a surefire recipe for a flood of spam complaints.
Sending to a list you bought will cause immediate, severe damage. It's just not worth it. The only sustainable way to grow is by earning genuine opt-ins from people who actually want to hear from you.
Summary & Your Next Step
Staying out of the spam folder in today's world boils down to four key areas: technical authentication (SPF, DKIM, DMARC), a strong sender reputation, engaging content, and a clean email list. Mastering these pillars proves to inbox providers that your emails are wanted and valuable.
Your Recommended Next Step: Use a free online tool like MXToolbox to check your domain's SPF and DKIM records right now. This is the foundational technical step you can't afford to get wrong.
At EmailGum, we're obsessed with giving you the strategies and in-depth guides you need to master email marketing. Explore our resources and start building campaigns that drive real results and keep you out of the spam folder.