Microsoft Outlook is one of the most widely used email apps, offering a range of features to enhance your email experience.
In this post, we will show you how to attach a file in Outlook, how to insert picture in email, and how to manage attachments in Outlook.
How to Attach Files in Outlook
Attaching files to your emails is a straightforward process in Outlook. Here’s how you can do it:
1. Create a New Email or Reply to an Existing One
- Open Outlook and create a new email or reply to an existing one by clicking on the "New Email" button or selecting "Reply" from the menu.
2. Select the Attach Button
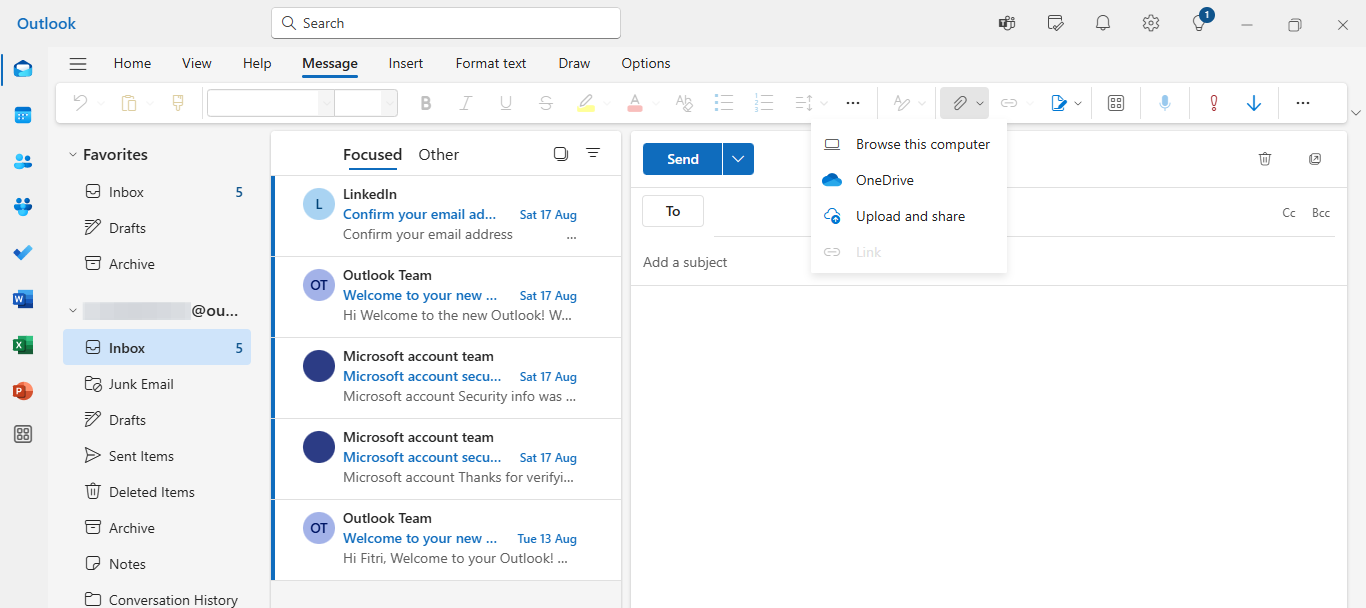
- In the compose window, click on the "Attach" button located at the top of the page. This button is represented by a paperclip icon.
3. Choose Your File
- A file explorer window will open, allowing you to browse your computer for the file you want to attach. You can select multiple files by holding down the CTRL (or Command on Mac) key while selecting multiple files.
4. Drag and Drop Files
- Alternatively, you can drag and drop files from your computer into the email body. As you drag the files over the new message, a Drop files here hint will appear.
5. Attach Files from OneDrive
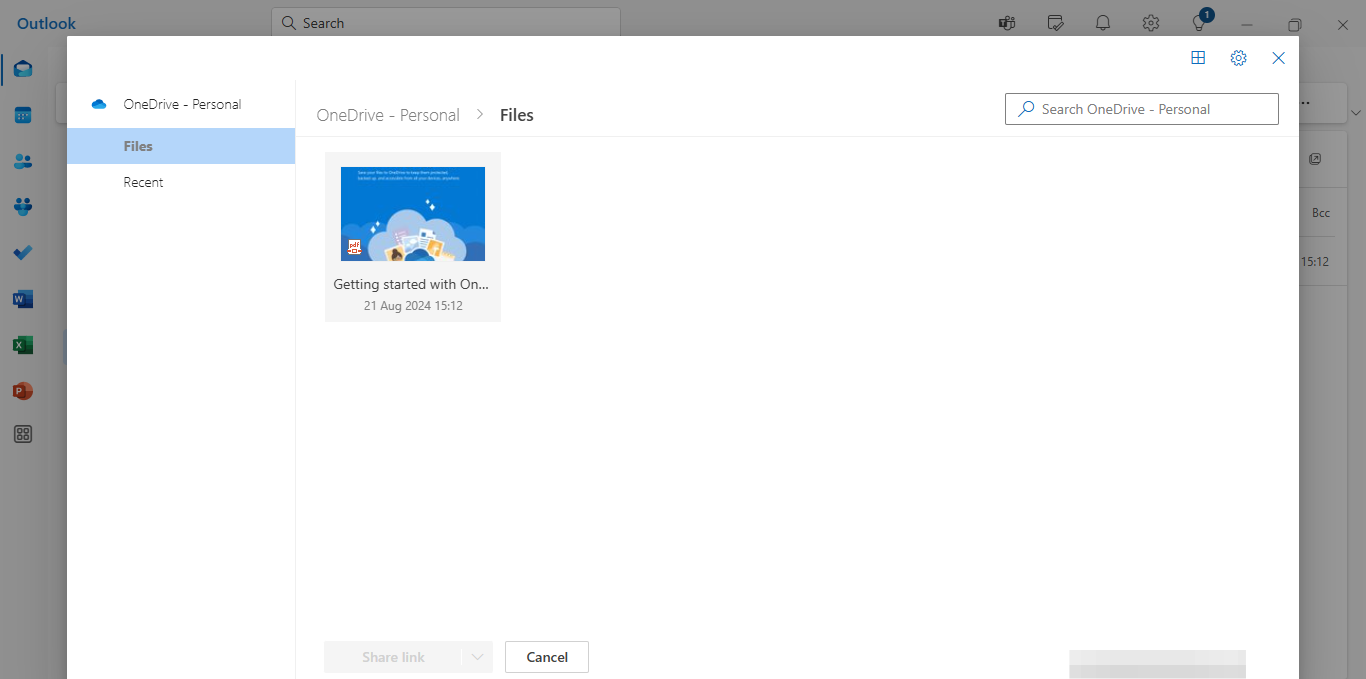
- If you have files stored in OneDrive, you can attach them directly from the cloud storage service. Select Attach, then Browse cloud locations, and choose the file from OneDrive. You can also use the Copy link option to paste the link elsewhere.
How to Insert Pictures into an Email
Inserting pictures directly into the body of an email is a feature that many users find particularly useful. Here’s how you can do it:
1. Position Your Cursor
- Open a new email or reply to an existing one and position your cursor where you want to insert the picture.
2. Select the Insert Picture Option
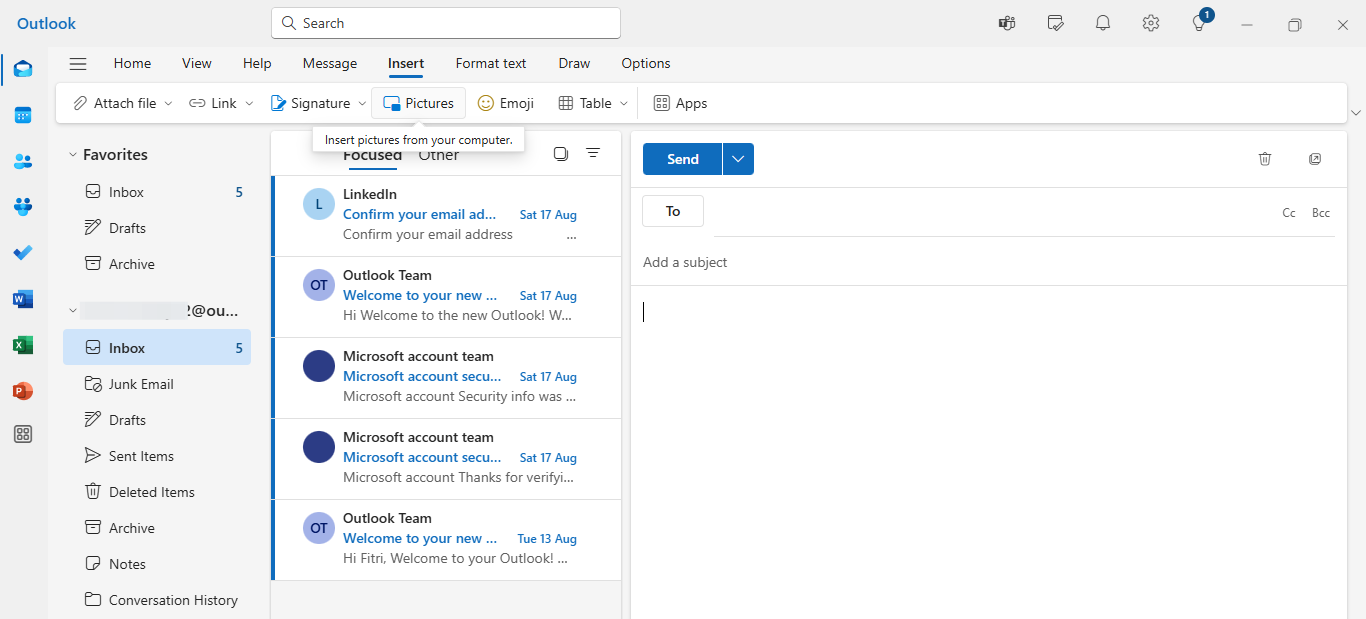
- Click on the Insert tab in the ribbon and select Pictures. This will open a file explorer window where you can choose the picture you want to insert.
3. Insert Multiple Pictures
- To insert multiple pictures, hold down the CTRL (or Command on Mac) key while selecting multiple files. Each picture will be inserted inline within the body of your email.
4. Resize Your Image
- Once the image is inserted, you can resize it by dragging the corner handles. You can also right-click the image to see additional formatting options.
How to Put a Picture in the Email Body
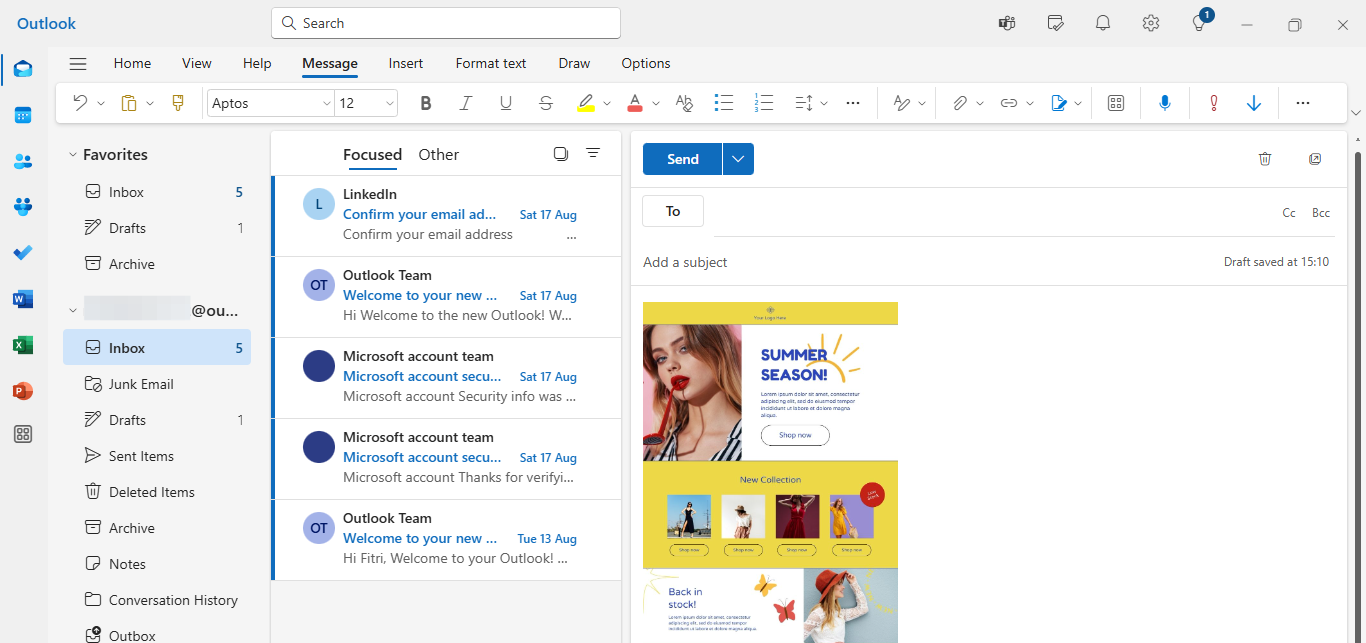
Inserting a picture directly into the body of an email allows recipients to view the image without needing to download it. Here’s how you can do it:
1. Open Your Email
- Open a new email or reply to an existing one.
2. Insert the Picture
- Click on the Insert tab in the ribbon and select Pictures. Choose the file you want to insert and click Open. The picture will be seamlessly integrated into the body of your email.
3. Format Your Image
- You can drag the corner handles to resize the image or right-click it to see additional formatting options. This ensures that your image is displayed exactly as you want it to be.
How to Attach a Folder in Outlook?
While Outlook does not allow you to attach folders directly, you can share folders from OneDrive and link them to your email. Here’s how you can do it:
1. Open OneDrive
- Select the OneDrive icon in the taskbar and choose View Online. This will open OneDrive in a web browser.
Share the Folder
- Drag the folder you want to share into OneDrive in the web browser. Then, go back to Outlook and select Attach, followed by Browse cloud locations. Choose the folder in OneDrive and select Next.
Manage Access
- By default, recipients will be able to edit the files in the folder. To change permissions so that recipients can only view the files, select Manage Access and choose Recipients can view.
How to Save an Email as an Attachment?
Saving an email as an attachment is useful for preserving important messages or sharing them with others. Here’s how you can do it:
1. Open the Email
- Open the email you want to save as an attachment.
2. Select the Email
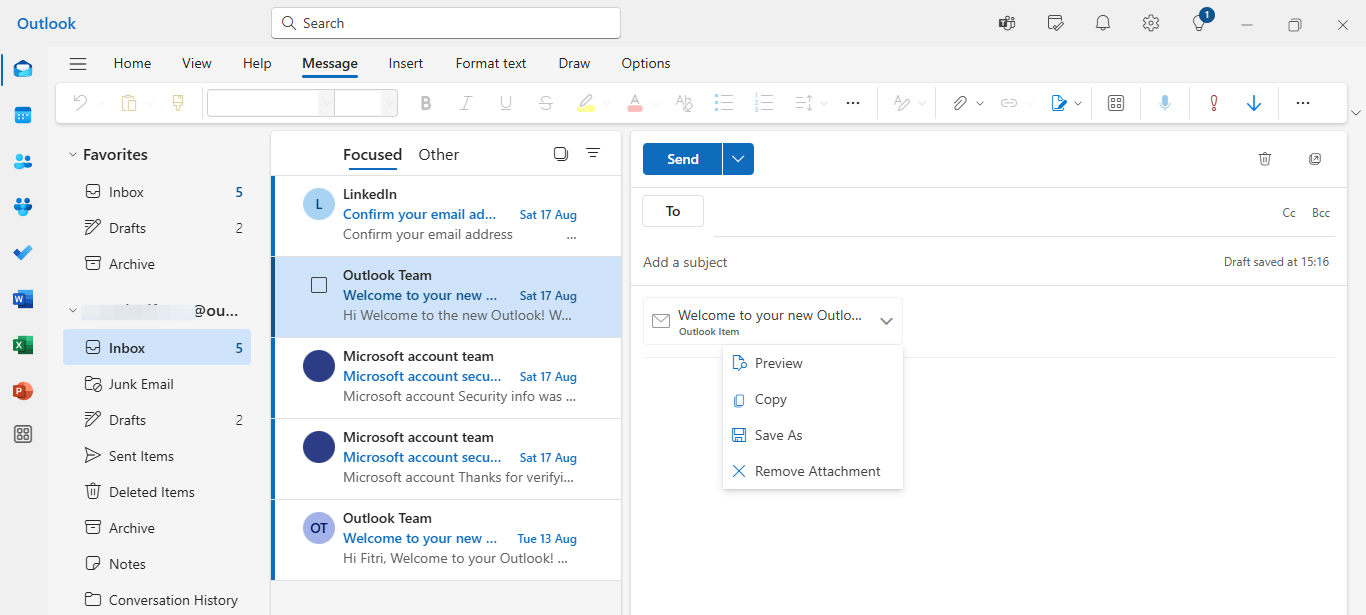
- Drag the selected message from the message list into your new message. As you drag it over the new message, a Drop messages here hint will appear.
3. Save as Attachment
- Once you have dragged the email into your new message, you can save it as an attachment by selecting the email and then clicking on Save As from the context menu.

Additional Tips for Managing Attachments in Outlook
1. Attachment Size Limit
- Be aware of the attachment size limit in Outlook. For local files, the limit is 34 MB, while for OneDrive files, the limit is 2 GB.
2. Security Considerations
- Always be cautious when opening attachments from unknown senders, as they can potentially contain viruses or malware.
3. Formatting Options
- Use the formatting options available in Outlook to ensure that your images and attachments are displayed correctly. This includes resizing images and adjusting text formatting.

How to Send Documents Securely Over Email?
It is very important to send documents securely over email to keep your information private and safe. We will talk about why encryption is important and give you step-by-step directions on how to send documents safely.
What is Encryption and Why it's Important?
Encryption is a method of encoding data so that it can only be decoded by those with the right to access it. This makes sure that even if someone gets a hold of your protected document, they won't be able to read what's inside. Encryption adds an extra layer of safety to your data, keeping it safe and avoiding possible data breaches.
It's impossible to say enough good things about encryption, especially when sending private or secret data. It helps keep your information safe from people who shouldn't have access to it, identity theft, and possible legal and regulatory problems. When you use encryption, you can be sure that your documents are safe while they are being sent.
How to Encrypt Your Document
To send documents securely, you can encrypt the files themselves before attaching them to your email. Here's how:
- Use File Encryption Software: Several software applications allow you to encrypt files or folders directly on your computer. Examples include VeraCrypt, AxCrypt, and 7-Zip. Install a reliable file encryption software and follow the instructions provided to encrypt your document.
- Password-Protect your Document: Many document creation software, such as Microsoft Word or Adobe Acrobat, offer the option to password-protect your files. Encrypt the document with a strong password that includes a combination of letters, numbers, and special characters. Make sure to communicate the password to the recipient via a secure channel, such as a phone call or a separate email.
- Use Online Encryption Tools: If you prefer not to install software on your computer, several online encryption tools allow you to encrypt files before sending them. Examples include FileEncryptor, PDF24, and SecureZIP. Upload your document to the chosen online tool and follow the provided instructions to encrypt the file.
How to Ensure Your Document is Sent Securely?
Encrypting the document itself is only part of the process. To ensure that your document is sent securely:
- Use a Secure Email Service: Choose an email service provider that offers robust security features, such as end-to-end encryption or secure socket layer (SSL) encryption. Examples of secure email services include ProtonMail, Tutanota, and Hushmail.
- Enable Two-Factor Authentication: Enable two-factor authentication (2FA) on your email account for an extra layer of security. This requires you to provide a second form of authentication, such as a verification code sent to your mobile device, in addition to your password when logging in.
- Verify Recipient's Security Measures: Before sending sensitive documents, ensure that the recipient's email account is also secured. Encourage them to use secure email services and enable 2FA.
- Share the Encryption Password Securely: If you've encrypted your document with a password, communicate the password to the recipient through a separate and secure communication channel. Avoid including the password in the email itself.

Common Issues When Sending Documents with Email
While emailing documents can be a straightforward process, it's not uncommon to encounter occasional issues along the way. So, we will discuss some common problems that may arise when emailing documents and provide troubleshooting tips to help you overcome them.
Why Your Document Might Not Be Sending?
- File Size Limits: Most email providers have limits on the largest file size that can be added to an email. If your file size is bigger than this, you might have trouble sending it. To meet the size standards, you might want to compress the file or split it into several smaller files.
- Connectivity Issues: For sending documents, you need a stable internet connection. You might not be able to send files if your network is down or your link is slow. Make sure you can connect to the internet again.
- Email Server Problems: Attachments can sometimes be sent problems because email systems are down for maintenance or technical issues. If you think this is true, try sending the paper again later.
- Blocked File Formats: Because of safety concerns, email providers may block some file formats. Make sure that the email service the recipient uses can handle the file type you want to send.
What to Do If Your Document is Too Large?
- Compress the File: If your document exceeds the file size limit, consider compressing it using file compression software or tools. Compressed files take up less space and are easier to send via email.
- Cloud Storage Services: Upload your document to a cloud storage service like Google Drive, Dropbox, or OneDrive. Share the document with the recipient by providing a secure link in the email. This allows you to bypass the file size limitations of email attachments.
How to Resolve Issues with Document Format?
- Check If File Is Compatible: Make sure that the person who will be receiving the file can open and read it by checking that it works with their email or software program. If you need to, you can change the file's format to one that many programs can read, like PDF or a popular Microsoft Office format.
- Convert to PDF: To keep the formatting and make sure it works on all devices and platforms, converting your text to PDF format is often the best option. For more information on how to convert documents to PDF, see the earlier part.
- Give Clear Instructions: If your document has a complicated layout or interactive parts, make sure the person who receives it knows how to view or use it correctly. This can help keep things clear and avoid problems.
By following these steps and tips, you can effectively manage attachments and insert pictures into your emails using Microsoft Outlook. Whether you're sending a simple message or a complex document, this tutorial will help you streamline your online communication and improve your email experience.
